
Quick Start Guide: Grandstream GRP2616 Phone
This guide will help you understand and configure the core communication features of the Grandstream GRP2616 professional IP phone, our preferred office desk model.
Hardware
Powering the Device
Your Grandstream GRP2616 can be powered in two ways:
1. Power Over Ethernet (PoE)
- Connect a high-quality Ethernet cable (CAT5e or better) to the LAN port on the back of the GRP2616.
- Connect the other end directly to a PoE-enabled network switch or a PoE injector.
- This delivers both power and high-speed network connectivity over a single line, minimizing cabling.
2. Power Adapter
- Connect the included 12V DC power adapter to the Power Jack on the back of the phone.
- Plug the adapter into a standard electrical wall outlet.
- Connect an Ethernet cable from your network router/switch to the LAN port on the phone base for internet connectivity.
Built-in Network Switch (PC/LAN Ports)
The GRP2616 features a built-in gigabit network switch with two ports to save cabling at your desk:
- Connect the incoming network cable to the LAN port.
- Connect a second Ethernet cable from the PC port on the phone to your computer.
- This passes your local network connection through to your desktop computer with minimal bandwidth overhead, so computer performance remains unaffected.
Setting Up and Connecting to Wi-Fi
While a wired Ethernet connection is recommended for maximum voice quality, the GRP2616 includes integrated dual-band Wi-Fi:
- On the phone screen, navigate to Menu > Settings > Network > Wi-Fi Settings.
- Set Wi-Fi to Enabled.
- Select Scan to search for available local wireless networks.
- Select your office network, enter the security password, and press the Connect soft key.
- Ensure the signal indicator on the main screen is solid before placing a test call.
Understanding the Buttons & Dual Displays
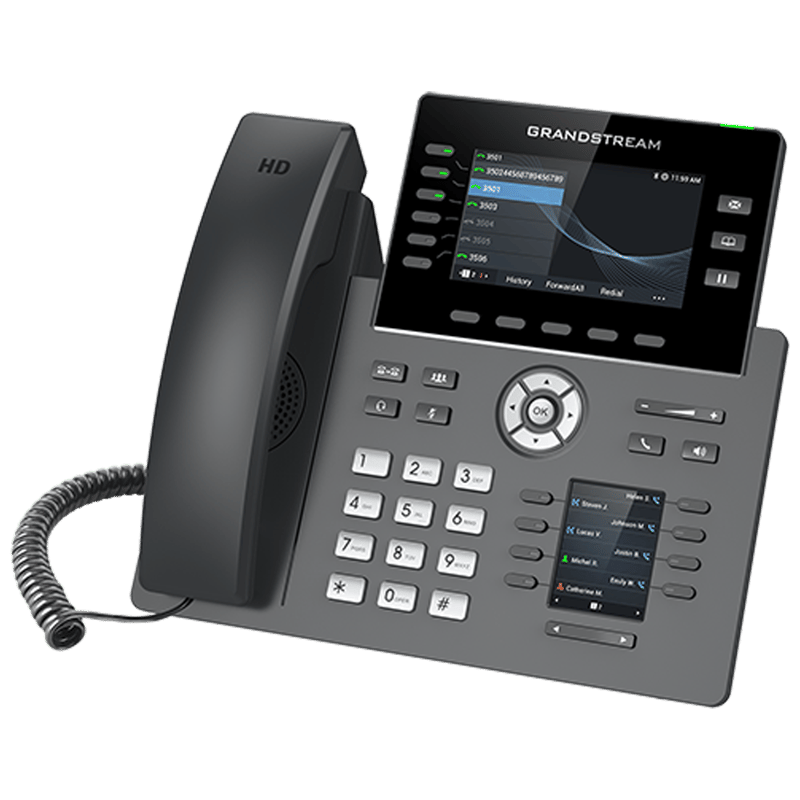
The Grandstream GRP2616 is equipped with a premium dual-screen design to separate active call details from status monitoring:
- Primary Screen: Displays active call information, caller ID, date/time, and context-sensitive soft keys below the screen.
- Secondary Screen (Right Side): Dedicated exclusively to displaying status indicators, speed dials, and Visual Parking Slots.
- BLF Keys (Busy Lamp Field): Physical buttons with dual-color LED indicators located around the displays.
- Green (Solid): The extension or parking slot is free/idle.
- Red (Solid): The extension is currently on an active call.
- Red (Flashing): A call is incoming or a parked call is waiting to be retrieved.
- Line Keys: The keys located to the left/right of the primary display. Use them to switch between active lines.
Making and Managing Calls
1. Attended Transfer (Warm Transfer)
An attended transfer allows you to speak with the recipient before routing the caller through:
- During an active call, press the Transfer soft key. This automatically places the original caller on hold.
- Dial the target extension number (or press their dedicated BLF key on your secondary display).
- Wait for the recipient to answer and explain that you have a call for them.
- If they accept, press the Transfer soft key again (or hang up) to complete the transfer.
- If they are busy or reject the call, press the Cancel soft key to return to the original caller.
2. Unattended Transfer (Blind Transfer)
An unattended transfer routes the call directly without speaking to the recipient:
- During an active call, press the Transfer soft key.
- Dial the target extension number or press their dedicated BLF key.
- Press the Transfer soft key again immediately. The call is forwarded, and your line becomes idle.
Handling Multiple Calls
Placing a Call on Hold
- During an active call, press the dedicated physical Hold button (represented by a pause symbol).
- The caller will hear your system’s hold music. Note that calls placed on hold are local to your phone and cannot be answered from other desks.
- To retrieve the call, press the corresponding flashing green Line Key or the Resume soft key.
- Use the Line Keys next to the primary display to easily toggle between multiple active lines.
Visual Call Parking
Visual Call Parking is the preferred way to place a call on hold in a shared office environment. Parking allows any desk in the office to retrieve the call with a single press of a button.
- Dedicated Park Slots: The secondary display on the GRP2616 is pre-configured with dedicated visual buttons representing shared parking bays (e.g., PARK 1, PARK 2).
- Parking a Call: During an active call, press any green (free) Park BLF key on the secondary screen.
- The call is moved to that slot, and the BLF indicator turns red across all phones in the office.
- The caller is placed on hold and hears the system hold music.
- Retrieving a Parked Call: To pick up the call from any phone in the office, simply press the corresponding red Park BLF key. The light will return to green, and you will be connected to the caller.
Checking Voicemail
1. Personal Voicemail
- The voicemail indicator light on the top right of the phone will flash red when you have a new message.
- Press the dedicated physical Voicemail button (envelope icon).
- Follow the audio prompts to listen to, delete, or save your messages.
2. Group Voicemail
- If a department or shared office voicemail is configured on your secondary screen, the designated BLF key will flash red.
- Press the flashing BLF key to access the group mailbox.
- Follow the prompts to review and manage shared team messages.
Call Flow Options (Day/Night Toggles)
The GRP2616 allows authorized users to toggle the office routing flows directly from the desk:
- Locate the pre-configured Call Flow BLF key on your secondary screen.
- Normal / Day Mode (Green): Incoming calls route to the main menu, receptionist, or ring group.
- Night / Forward Mode (Red): Press the key to route incoming calls directly to an after-hours answering service, voicemail box, or cellphone number.
Additional Common Features
Three-Way Conference Calls
- During an active call, press the Conference soft key.
- Dial the third party’s number or press their BLF key.
- Once the third party answers, press the Conference soft key again to bridge all three participants together.
Do Not Disturb (DND)
- Press the dedicated DND soft key while the phone is idle to silence all incoming ringers.
- When DND is active, incoming calls will route directly to your voicemail.
- Press the DND soft key again to toggle it off.
Adjusting Volume
- Use the volume bar at the bottom of the keypad to adjust the ringer volume while the phone is idle.
- Adjust the volume bar during a call to modify the hand-set, speakerphone, or headset audio level.